Assignment Workflows in Qvidian for Office
Permissioned users can create assignment workflows when working in Qvidian for Office. Interacting with workflows here is similar to interacting with workflows in Qvidian’s Projects workspace. Workflows created in the Projects workspace will also appear when users work on the response in Qvidian for Office. Assignment workflows can be created in documents that are part of a Project or in Microsoft Word and Excel files that aren't housed in a Qvidian Project.
Creating Assignment Workflows
On the top left of the Qvidian for Office panel, click the Menu icon and select Assignments. The Assignment screen displays all workflows in the response as well as the project’s overall status and due date.
- Click the Menu icon and select Assignments.
- Click the Participants tab, and then click the Manage Participants
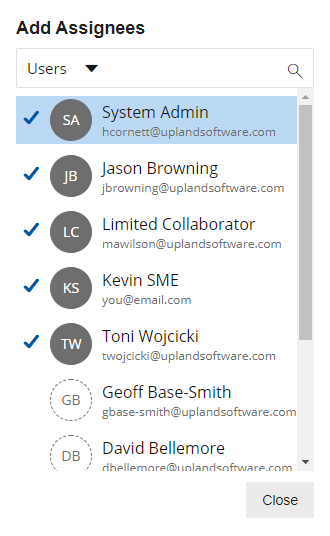
 icon. The "Add Assignees" dialog displays.
 - Locate the users to add to the project. You can narrow the results with the "Users" dropdown filter:
- Users: As the default in the Users dropdown menu, it allows project owners to search among all available users to add participants.
- Participants: Project owners can refine their view to only show existing project participants.
- Teams: Project owners can add entire teams of users as participants.
- Enter two or more letters into the search bar to locate a specific User, Participant, or Team. Results begin populating below the search bar once text is entered.
- Click the desired User, Participant, or Team to add them to the project. Once added, a blue checkmark appears to the left of an existing participants' initials.
- Click Close to exit out of the "Add Assignees" dialog and save any changes.
Note: Permissioned users can save groups of participants to Teams. This allows commonly grouped participants to
be added to projects all at once, rather than adding each participant manually. To create a Team of Participants, click the Save Participants as a Team  icon. Enter a Team Name and Description and then click Save.
Tip: For more information on creating assignments, see Create and edit project assignments .
- Click the Menu icon and select Assignments.
- Place your cursor anywhere within a question or slice that you want to assign.
- Click the + icon to create a workflow for the selected question.
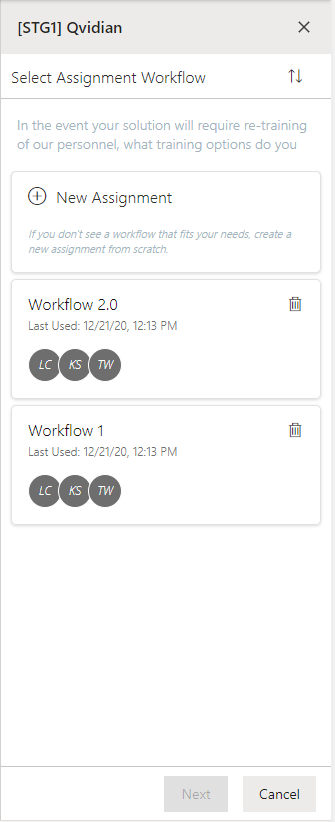
- Choose whether you want to create a new assignment workflow or reuse an existing one.
- (Optional) Enter a task name. By default, the system will name new workflow steps “Workflow Task,” allowing users to leave the default workflow task name unchanged to create workflows faster when there’s no need to replace the default name with something more descriptive. Admins can change this default to the name they prefer via the “DefaultWorkflowTask” Global Setting.
- (Optional) Click the Calendar
 icon and select a date/time, or enter the date in the date and time field. Use the left and right arrows on either side of the month to move to the previous or next month.
 - (Optional) Click the Add Assignees button to add assignees to that step. The "Add Assignees" dialog box appears.
- Narrow down the list by selecting: Users, Participants, or Teams from the dropdown menu. Once a user outside the project is assigned, they are automatically added as a project Participant.
- Enter two or more letters into the search bar to locate a specific user. Results begin populating below the search bar once text is entered.
Note: Once selected, a blue checkmark appears to the left of the participants' initials. To remove an assignee, click the participant name again so that the blue checkmark is no longer visible.
- (Optional) To require all participants to complete their task before the workflow can move to the next step, click All Complete; icon will then read "All Complete". By default, all steps are set to "Any Complete."
- (Optional) Click Add new step to add more steps to your workflow.
- (Optional) Drag and drop the steps to rearrange the order of the workflow.
- (Optional) Click the More
 menu to:
 - Insert Step Above
- Insert Step Below
- Delete
- Complete Task
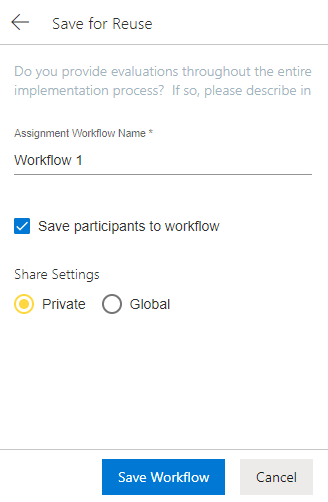
- (Optional) To save this assignment workflow for future use, click Save for Reuse. This eliminates the need for commonly used workflows to be recreated manually every time they're needed.
- Enter an Assignment Workflow Name.
- (Optional) Unselect the Save participants to workflow checkbox to save the steps in your workflow without including its participants. By default, this checkbox is selected so Upland Qvidian will remember the participants associated with saved workflows.
- (Optional) Update your Share Settings. By default, a saved workflow is "Private" and therefore only visible to the project owner that created it. To make a saved workflow available to all permissioned users, select "Global."
- Click Save Workflow.
- Click Save.
Note: This will be the step's due date. The default date is the due date of the project.
Note: Workflow steps can be set to either: "All Complete," which requires all participants to complete the assigned task or "Any Complete," which only requires one participant to complete the assigned task. You may want to require only one of the participants to complete the task if you have assigned it to a team, but any member of the group can answer it. You may want to require all the participants to complete the task if the question contains multiple parts, or requires approval from all participants.
Users can create assignments in Microsoft Word and Excel files that aren't housed in a Qvidian Project. This allows teams to benefit from assignments by tracking progress, collaborating, and communicating more effectively in Qvidian for Office.
Example: Users that store their RFPs and other files on SharePoint, OneDrive, Teams, or Box may want to create assignments in documents that are not housed in a Qvidian Project.
Note: To create assignments in local Microsoft Word and Excel files, the following permissions must be enabled: "Allow user to create assignments in Microsoft Word/Excel files outside of Qvidian" and "Create new Projects". Once an assignment is created in a local Word or Excel file, a Project ID and RFP File ID links the file to a new project, allowing the file to function as a standard unsliced RFP where revisions can be uploaded.
Tip: For more information on creating assignments, see Create and edit project assignments .
- Click the Menu icon and select Assignments.
- Place your cursor anywhere within a question or slice that you want to assign.
- Click the + icon or the + Create Assignment button to create a workflow for the selected question.
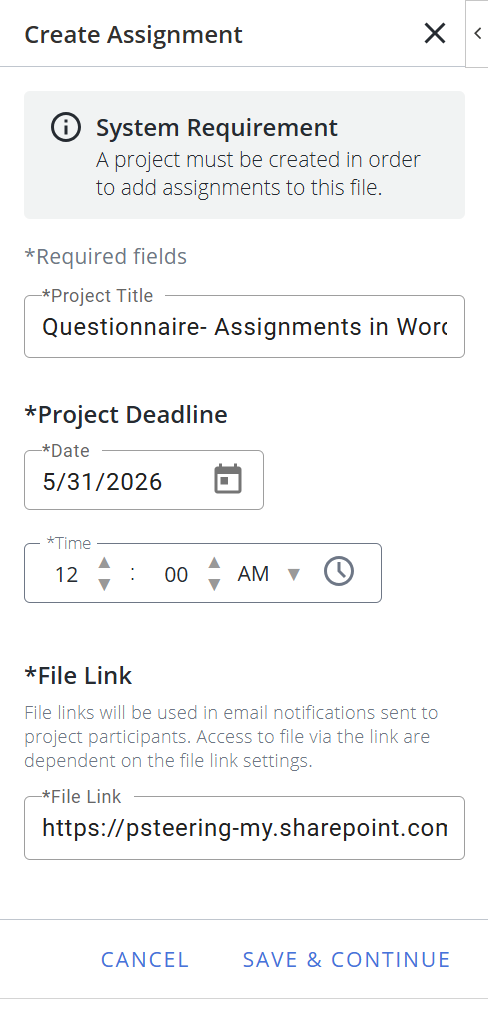
- If desired, update the Project Title. By default, when an assignment is created in a local file, a project is automatically created and named after the local file.
- Enter a Project Deadline by clicking the Calendar icon and select a date/time, or enter the date in the date and time field. Use the left and right arrows on either side of the month to move to the previous or next month.
- Enter the File Link. This is where the local file is stored (e.g. SharePoint, OneDrive, Teams, or Box).
- Click Save & Continue.
- Choose whether you want to create a new assignment workflow or reuse an existing one.
- (Optional) Enter a task name. By default, the system will name new workflow steps “Workflow Task,” allowing users to leave the default workflow task name unchanged to create workflows faster when there’s no need to replace the default name with something more descriptive. Admins can change this default to the name they prefer via the “DefaultWorkflowTask” Global Setting.
- (Optional) Click the Calendar icon and select a date/time, or enter the date in the date and time field. Use the left and right arrows on either side of the month to move to the previous or next month.
- (Optional) Click the Add Assignees button to add assignees to that step. The "Add Assignees" dialog box appears.
- Narrow down the list by selecting: Users, Participants, or Teams from the dropdown menu. Once a user outside the project is assigned, they are automatically added as a project Participant.
- Enter two or more letters into the search bar to locate a specific user. Results begin populating below the search bar once text is entered.
Note: Once selected, a blue checkmark appears to the left of the participants' initials. To remove an assignee, click the participant name again so that the blue checkmark is no longer visible.
- (Optional) To require all participants to complete their task before the workflow can move to the next step, click All Complete; icon will then read "All Complete". By default, all steps are set to "Any Complete."
- (Optional) Click Add new step to add more steps to your workflow.
- (Optional) Drag and drop the steps to rearrange the order of the workflow.
- (Optional) Click the More menu to:
- Insert Step Above
- Insert Step Below
- Delete
- Complete Task
- (Optional) To save this assignment workflow for future use, click Save for Reuse. This eliminates the need for commonly used workflows to be recreated manually every time they're needed.
- Enter an Assignment Workflow Name.
- (Optional) Unselect the Save participants to workflow checkbox to save the steps in your workflow without including its participants. By default, this checkbox is selected so Upland Qvidian will remember the participants associated with saved workflows.
- (Optional) Update your Share Settings. By default, a saved workflow is "Private" and therefore only visible to the project owner that created it. To make a saved workflow available to all permissioned users, select "Global."
- Click Save Workflow.
- Click Save.
Note: This will be the step's due date. The default date is the due date of the project.
Note: Workflow steps can be set to either: "All Complete," which requires all participants to complete the assigned task or "Any Complete," which only requires one participant to complete the assigned task. You may want to require only one of the participants to complete the task if you have assigned it to a team, but any member of the group can answer it. You may want to require all the participants to complete the task if the question contains multiple parts, or requires approval from all participants.
Note: Once an assignment is created in a local Word or Excel file, a Project ID and RFP File ID links the file to a new project. The project properties can be updated directly in the local file by clicking the Menu icon and selecting Project Properties. From here, you can update the Project Title and Project Deadline. Project properties can also be edited from within the Documents & Projects grid.
Caution: Users cannot delete an existing assignment or add new assignments for local Word/Excel files from within the Qvidian project; they can only edit existing assignment workflows. If a user accesses the RFP file from within the Project, the only action available for these files in the RFP Workspace is View Full Preview. The Build Package and Finish and Build buttons in the Project will be disabled.
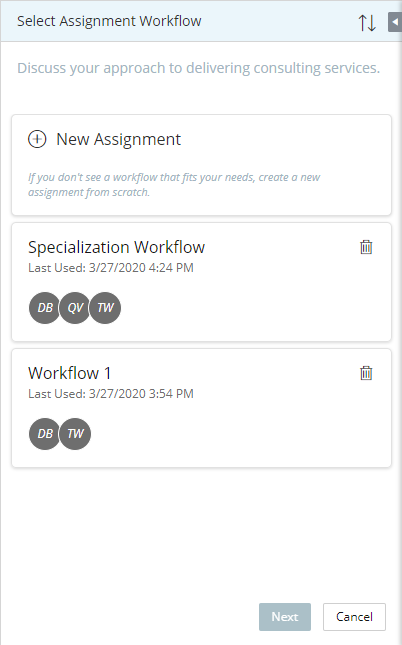
Saved assignment workflows can be re-purposed and modified as needed for new assignments.
- Begin by creating an assignment. The Select Assignment Workflow panel will appear.
- Select an existing workflow.
- Choose which participants to include:
- Include only project participants: Applies the steps in the saved workflow, but only includes participants associated with the workflow if they are already participants in the project.
- Include all workflow participants: Applies the steps in the saved workflow and includes all participants associated with the workflow. If one or more of these participants are not already included in the project, Upland Qvidian will also add them as participants to the project.
- Exclude all participants: Applies the steps in the saved workflow, but excludes all participants associated with the workflow
- Click Next.
- (Optional) Modify the workflow for your use case.
- Click Save.
Managing Assignment Workflows
Managing Participants
Depending on your permissions, you can reassign remaining tasks, remove participants from a project, or grant/remove owner permissions.
Note: For more information on participants, see Add and manage participants in projects.
You can select another participant to whom you will reassign all remaining tasks. For example, if a key participant leaves on vacation or becomes overburdened.
- Click the Menu icon and select Assignments.
- Click the Participants tab and locate the desired participant.
- Click the More icon.
- Select Reassign Remaining Tasks. The Reassign Remaining Tasks panel appears.
- Click the Add Assignees button. The "Add Assignees" dialog appears.
- Narrow down the list by selecting: Users, Participants, or Teams from the dropdown menu.
- Select the user(s) you wish to reassign all remaining tasks. Once selected, a blue checkmark appears to the left of the reassigned participants' initials.
- Click Reassign.
Note: The Users option is only displayed if the "Allow users to assign tasks to users outside of the project" user permission has been enabled. Once a user outside the project is assigned, they are automatically added as a project Participant.
Note: After reassigning tasks, Qvidian automatically emails the new assignees and the project owner.
Project owners can remove a participant from the project and delete their assigned tasks. Any assignments with tasks assigned to the remaining participants will stay active.
Example: A project owner may use Remove if one out of three reviewers on an assignment becomes unavailable, and the assignment can be completed by any of the three reviewers. In this case, the project manager can remove the unavailable reviewer, and either of the remaining reviewers will still be able to complete the assignment.
- Add Assignees dialog box method:
- Click the Menu icon and select Assignments.
- Click the Participants tab, and then click the Manage Participants icon. The "Add Assignees" dialog displays.
- Click any existing participant(s), identified by a blue checkmark to the left of their initials, to remove them from the project.
- Click the Menu
- More menu method:
- Click t the Menu icon and select Assignments.
- Click the Participants tab and locate the desired participant.
- Click the More icon.
- Select Remove.
- Click t the Menu
The initial project owner can grant other
participants owner permissions. Everyone with owner permission can manage the project together. Project owners (indicated by the Project Owner icon ) have full rights to the project.
- Click the Menu icon and select Assignments.
- Click the Participants tab and locate the desired participant.
- Click the More icon.
- To grant owner permissions, select Grant Owner Permission. The Project Owner icon will appear next to the participants initials.
- To remove owner permissions, Select Remove Owner Permission.
Note: Project owners may remove their owner permission if there is at least one remaining active owner.
Managing Tasks
Depending on task status, you may complete your own tasks, re-open closed tasks, and view workflows. Project owners can complete and re-open tasks on behalf of other participants.
A list of a user’s assigned tasks and statuses can be viewed by using the Assignments filter.
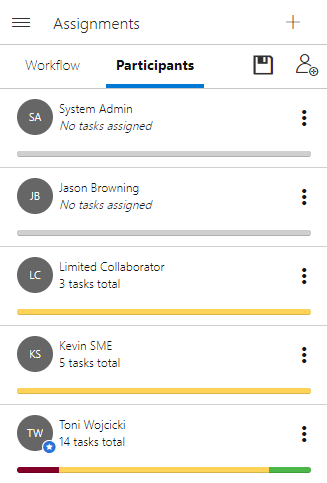
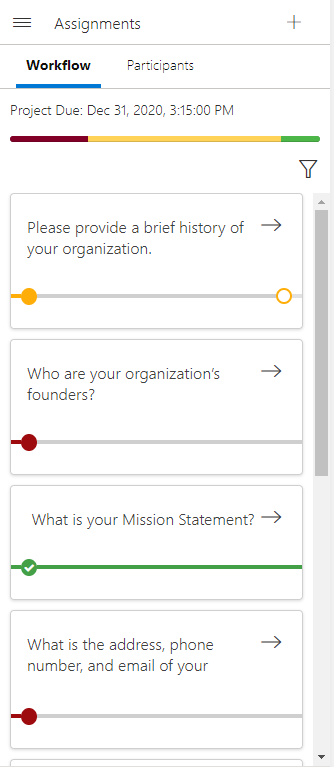
Example of the Workflow tab (left) and Participants tab (right) in the Assignments panel. Click to enlarge.
- Click the Menu icon and select Assignments.
- Click the Workflow tab.
- Click the Filter
 icon. The "Filters" dialog will appear.
 - Select the desired Assignment Status and Participants filters. Click Apply.
- View the participant's task status:
- Yellow Filled Circle: Current step that is "In progress".
- Yellow Empty Circle: Future step that is "In progress".
- Red Filled Circle: Current step that is "Past due".
- Red Empty Circle: Future step that is "Past due".
- Green Filled Circle (with a white checkmark): Completed step.
You can complete an individual task step via the Library panel or Workflow tab.
Note: For more information on completing tasks, see Complete your project assignments.
- Click the Menu icon and select Assignments.
- Click the Workflow tab.
- Click the –> arrow on the assignment card to view the workflow.
- Click the More icon.
- Select Complete My Task to complete your task.
- Click the Menu icon and select Assignments.
- Click the Workflow tab.
- Click the –> arrow on the assignment card to view the workflow.
- Click the More icon.
- Select Reassign My Task. The Reassign Remaining Tasks panel appears.
- Click the Add Assignees button. The "Add Assignees" dialog appears.
- Narrow down the list by selecting: Users, Participants, or Teams from the dropdown menu.
- Select the user(s) you wish to reassign your task. Once selected, a blue checkmark appears to the left of the reassigned participants' initials.
- Click Reassign.
Note: The Users option is only displayed if the "Allow users to assign tasks to users outside of the project" user permission has been enabled. Once a user outside the project is assigned, they are automatically added as a project Participant.
Owners have full access to modify workflow steps. Modifications to the workflow steps may affect the progress status of the project and its assignments.
Note: For more information on editing assignments, see Create and edit project assignments .
- Click the Menu icon and select Assignments.
- Click the Workflow tab.
- Click the –> arrow on the assignment card to view the workflow.
- Click the Edit
 icon to edit the existing assignment.
 - Edit the steps as desired. For more information, see Creating Assignments.
- Click Save.
- Click the Menu icon and select Assignments.
- Click the Workflow tab.
- Click the –> arrow on the assignment card to view the workflow.
- Click the More icon.
- Select Re-open Task from the dropdown menu. This selection is only available for completed tasks.
- Enter a Comment into the "Incomplete Task Notification" dialog.
- Click OK.